Let’s talk about how to record bass guitar.
Is there a “best” way to do it? What sort of things do you need to know to make a good recording of a bass part? And do you really need to have good gear these days?
Computer programs and amp sims have gotten so good but does that mean the hardware is now surplus to requirements?
We’ll answer all of these questions in due course but first of all, let’s start with a few basics.
How do you actually record bass on a computer?
- Install a DAW on your computer
- Buy an audio interface, jack cables and a DI
- Add an amp sim or use a mic on your amp if you like
- Gain stage so your signal isn’t peaking
- Start recording
What You’ll Need
These days you’ll need a computer of some sort (a lot of folks use a good laptop or desktop computer), you’ll need a DAW (digital audio workstation) which essentially serves as a software version of a recording studio, you’ll need something called an audio interface which will connect your bass signal to the DAW and of course you’ll need a bass.


- Pro performance with great pre-amps – Achieve a brighter recording thanks to the high performing mic pre-amps of the Scarlett 3rd Gen. A switchable Air mode will add extra clarity to your acoustic instruments when recording with your Solo 3rd Gen.
- Get the perfect guitar and vocal take with – With two high-headroom instrument inputs to plug in your guitar or bass so that they shine through. Capture your voice and instruments without any unwanted clipping or distortion thanks to our Gain Halos.
- Studio quality recording for your music & podcasts – Achieve pro sounding recordings with Scarlett 3rd Gen’s high-performance converters enabling you to record and mix at up to 24-bit/192kHz. Your recordings will retain all of their sonic qualities.
- Low-noise for crystal clear listening – 2 low-noise balanced outputs provide clean audio playback with 3rd Gen. Hear all the nuances of your tracks or music from Spotify, Apple & Amazon Music. Plug-in headphones for private listening in high-fidelity.
- Easy Start – It’s easier than ever to get up and running with your Scarlett 3rd Gen with our online tool, Easy Start. Whether you’re looking to record or playback audio, we will help you get started.
- With Scarlett 3rd Gen, you have all the tools you need to start recording right, now – We’ve partnered with our favorite industry partners to provide you with plenty of sound content and software so that you can create and record music right away.
- Enjoy three years of warranty – Wherever you happen to be in the world, you can rely on a three-year warranty if any Focusrite hardware needs repairing or replacing due to a manufacturing fault.

I’m not going to go deep into specific DAW’s or interfaces because there are a million other articles and videos online that do but this is the bare minimum you’ll need to record your bass.
But, if this is the minimum then why do you see recording studios with so much more stuff? Why do they use microphones or special rooms to record in?
This video will show you all the basic gear you need and how to connect it all to your computer.
The answer is that the method of recording makes a difference and changes the sound of what you capture. And different pieces of music often require different approaches to sound good.
So what are these different approaches?
Different Approaches You Can Take
For recording bass, two of the most common will be using something called a DI or using a microphone to record a bass going through a bass amp.
So what’s the difference between the two?
A DI (direct injection) will capture your signal completely and send it in to the interface which then goes into the DAW.
There are a lot of great DI’s on the market and many like the A-Designs REDDI or the Jule Monique Dovecage will actually colour the sound of your bass in someway.
This is down to the components of each DI and can even be a result of the settings that some DI’s have like EQ.
A DI sound will be very clean and they do capture 100% of your signal giving you a very full, fat and complete sounding signal.
The downside of a DI is that they can sometimes sound a little lifeless because they don’t move any air in the way that hearing a bass through an amp would.
As bass players, we’re so used to hearing our basses through amplifiers and this means that we unknowingly get used to the sound of air being moved but also the sensation of loudness is a physical sensation.
We can feel the air being moved when we turn an amp up loudly for example.
Capturing the sound of a bass moving through the air is something a DI can’t do but a microphone can.
And this is the biggest difference between the two.
A mic will often sound more present and offer a sound that has more character. If you listen to rock bass players on recordings you’ll often be hearing the sound of a mic’d bass cab.
This makes it great for recording acoustic instruments. For example, putting a mic on an upright bass that’s playing walking bass lines will give it so much more presence in its sound. The same goes for recording a bass amp.
However, the downside of a mic is that it won’t capture as complete a picture of your signal and depending on the mic that you use, certain frequencies might not be picked up as a result of the frequency response of the mic you are using.
So you may have noticed that what the mic lacks the DI makes up for and vice-versa.
For this reason, many bass players will actually blend the two and get the best of both worlds.
I’ve done this and it does sound awesome.
This video talks through the differences between DI’s and mics.
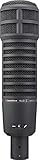
- The classic sound of FM radio voices
- Smooth, natural and controlled sonic character
- Variable-D for minimal proximity effect
- True cardioid with no coloration at 180-degrees off-axis
- Voice tailored frequency response
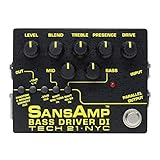
- Capable Of: Much more than just a direct box, the SansAmp Bass Driver DI is capable of dialing up big vintage tube tones, bright modern slap sounds, gnarly distortions, and all in between
- Three Different Outputs: Three different outputs to drive power amps, recording desks, PA mixers, or simply enhance your currentrig
- Controls: Controls include Presence for definition and upper harmonic content; Blend to combine the proportion of direct signal and SansAmp circuitry, and active EQ specifically tuned for bass with 12dB of cut or boost
- Adjust Bass Frequency: With the popularity of 5 and 6-string basses going beyond fad status and becoming mainstream, a switch is added to adjust the bass frequency to extend into those lower registers
- Mid Range Control: Mid-range control and a switch are also added to adjust its frequency
Mic Alternatives
You can get great VST (essentially computer programs that simulate) DI’s, mic’s and bass amps. These are very convenient if you buy them when they are on offer they can be very cheap and they give you a lot of options.
But does this mean there’s no point in actually buying a physical amp, DI or mic then?
Not so fast.
If you only ever record at home, on your own computer that has your own VST’s then, yes, perhaps you don’t need to purchase an amp, mic or DI because you’d have your recording set up on your computer.
But if you work in other recording studios or even go to a friends house to record on their computer, there’s no guarantee that they’ll have the VST’s you like.
This is where having a physical DI or mic really comes in handy.
They can be taken to any studio (they all have connections that are universal so you can plug them in at any studio) and they’ll always give you a consistent sound.
I also see plenty of bass players these days who will have a DI they take to gigs along with a set of in-ears so they can get a consistent sound wherever they go.
Ultimately all these pieces of gear, whether they are physical or virtual, will only be useful if you learn how to use them.
If you only sound as good as the gear you own then you’ll be out of work as soon as someone buys something better than you.
However, if you understand the principles of recording and understand how to construct a bass tone, understand why a mic would be a better option for a song that needs a characterful and aggressive bass tone or understand why a DI would be great for that bass sound that needs to blend into the background and provide a bed for the to rest of the music to sit on then you’ll be able to sound great with average gear.
The value is in knowing how to use what you have to get the best out of it and not in letting the gear use you.
This video will show you some great free and paid amp VST’s you could use.
Leave a Reply